Wednesday, October 16, 2013

WIP


This week I really have to many mommy things going on to sew very much, but when I get a few minutes the machine is chucking along!  


Hailey wants to be Belle for Halloween.  This is really fun for me, because most 11 year olds want nothing to do with being a "Princess".  Keeping her little for another year is just what I need (though she's over 5' already).  I was thinking the other day how almost 2/3 or 66% of her time at home while I'm raising her is over.  Time passes so quickly!

Now I just need to make the top and the poofy slip!


I'm working on sashing this MSHBQAL.  This week is suppose to be the quilting week, but let's just say I'm a little behind.

I do have 20 of my 24 blocks made.


Now off I go to get ready for teaching our rotating preschool in a few hours.  Tomorrow is my Princess #4's birthday do I'll be showing of the cake and fun birthday party tomorrow!

I'm linking up to Freshly Pieced, (her links on my sidebar).


I also just recently finished my 3 year olds new blankie.  Thankfully she loves this!

I just used my walking foot for quilting this with straight lines.

This is the quilt I made for my neice Ashlee and is my FMQ!

Here you can see its swirls.


I really love the choice of fabrics on the back.


Friday, October 11, 2013

Ashlee's quilt

For the past few months I have slowly  working (along with my 9 year old) on a quilt for my neice Ashlee.  My 9 year old made all the 16 square blocks, while I did the rest.  
I haven't had a lot of time to work on this quilt lately, but I've been slowly trucking along the last two weeks with quilting.  This is my first MQ so I started out very slowly.  My machine had a few problems, as I posted before, but it was taken care of.  Last night I finished the last 2/3 of the quilt quite easily.  But, there's always a BUT there, the first section I did had horrible tension.  I figured the problem out and corrected the tension yet I had to rip the seams on one section.  Thankfully when the tension is off, seams rip easily.


I ripped and requilted that this morning.  If I wasn't at the Opthamologist right now, I would be sewing the binding on now.

Later:
 
Time to finish this off and sew 1/8" seam all around the quilt.

Cutting off the excess batting and fabric:


And the last step here in my basement is sewing on the binding which we preening on a large spool of thread: 


I am using 2 1/4" binding folded in half.


Wednesday, October 9, 2013

WIP

Last week, sewing projects started to fall apart.  I was doing really good in that I finished my 3 yer olds new blankie and I was really doing great on my first ever free arm quilted quilt.  Until Thursday!  I accidentally got my finger to close (to that unprotected darning foot) and had the needle go through the side of my pointer finger.  It was just a small wound, we'll actually two, where the needle went in and out.  It was a new needle and I had had a tetanus shot 5 years ago so I opted not to have it looked at by a Dr.  It looks good now and hasn't had any signs of infection.  
After this I stopped for the day, Thursday was out.  So Friday, I started chucking along on the machine quilting, when my machine just stopped!  I couldn't get the needle to move!  After a few nudges I finally got it up so I could remove the quilt and figure out the problem.  I cleaned the machine, but still nothing. 
My husband and my father each love to fix things so I thought to myself I can fix  this.  And I took the machine apart, all 13 screws.  This is what I found

Wow!!!

I recleaned the machine and it would move but not smoothly.  I figured it was the needle casing from the tension it was getting so I oiled it and now, its working great!  My manual said not to oil your machine, it won't need it.  I think I use my machine a little more than normal the average person with this costco machine.  Someday I'll get me a new one, now it's just a dream.  
So here's my progress and what I'll be working on today:

Wish me luck!

I'll link this into freshly pieced 

Tuesday, October 1, 2013

No time to POST!

It seems that time is literally flying by.  There is not enough time for cleaning (up after 4 keiki's), not enough to accomplish all I want to with my 3 year old, little time for scrapbooking and little time for quilting.  Where does it all go?  That's a question I wish I could answer.

Today I have finished quilting my first machine quilting quilt.  This one is only stripes done with a walking foot.  The next quilt I'll try something more fun, but this one I needed simple.  I also got the bindin sewn on but not without a fun mistake.  

Notice anything funny about the binding I'm sewing on in the picture?

We'll, the quilt is pink/white/green and the binding is BLUE.  The colors go great together, but they just don't match this quilt.  So after some seem ripping, here is what I put away when I am going to bed... And started blogging.
 
I am hand stitching the binding on and so while watching NCIS tonight I was able to get 3 of the 4 sides seen on.  Tomorrow night I'm really hoping this WIP becomes a finished project!

Wednesday, September 25, 2013

WIP

I have so many projects going right now!

I've just started working on these blocks and have 4 made so far.  They are with a quilt along hosted by Molli Sparkles it's his MSBHQAL.  It's fun and I really love the laid back look of this Robert Kaufmann fabric.


Besides these blocks I am 3 months behind on my BOM kit so today my project is making these blocks before our Saturday meet up. 

Besides all this craziness and being a mom to 4 little keiki, I am also learning to use my walking foot and doing stripes on this quilt you have seen me slowly puttin together.


I'll link this all up to Freshly Pieced !  Have a great Wednesday!  


Friday, September 20, 2013

Another step finished!

Now it's ready to quilt.  I have never machine quilted a quilt before, everything I have done has been hand quilted on huge frames.  Well except for a quilt as you go and I don't really count that.  So last night I didn't know how long it would take to baste this quilt, it's only a lap size quilt, but it took almost two hours.


It isn't finished, but the next step is finished!  I have another fun green Moda print for the binding and I can't wait to finish it completely.  I still don't know what to do with this quilt.  Maybe I'll sell it, but I'm not sure yet.


I'm linking this to Kelly at Needle and Thread Thursday. 

Today I'll be finishing the top of another WIP and basting it so that next week I can get them both quilted.  


Wednesday, September 18, 2013

Works in Progress


When I ran across this Glamping by Moda fabric in my Cotton Shop store last month I knew that this was a fabric for me. As a mother of four daughters I really love the "girly" fabrics out there.  This was purchased in mind for my 3 year old.

It is a basic four patch pattern that is lap quilt size.  It may be a little to big to replace my 3 year olds, drag everywhere, blankie, but we can always hope it that it works :)


For the past 7 years I have been on the DT for Storytellers scrapbooking club.  Yesterday I received the email I had known was coming for a long time, they sold the company and their kits are finished.

It's a very sad day.  I've been getting their scrapbook kits for 9 years.  Their discussion boards have been a big part of my life for that long.   On different occasions, I have met multiple women from the discussion boards.  Together we have talked through so many excitements to trials in life, that they are almost like family.  I hope we can stay in touch, but truthfully I know that it won't be easy.  

I guess I have been feeling like the company owners Jeff and Leslie did, scrapbooking has had a time and place and that it is ending.  They sold the company and I turned my creativity to quilting.  Hopefully I will still scrapbook my childrens childhoods because we all know how I have so many scrapbooking supplies.  


Last night I had to create this page just to use some more of one of their kits.  The pages were so easy and so fun to put together.  Bye!

Friday, September 13, 2013

Friday's Rag Quilt!


I can happily say that this week I finished a project!  In prior posts I have posted about the quilts I am making for my nephew and niece.  My nephews' quilt is now finished and ready for him to pick up!


He is attending college at BYU this fall as a new freshman, so what could be better than a navy blue quilt?  I even was able to add a few BYU squares. 


Truly I don't count this as quilting as it was a quilt as you go quilt.  Each block has an X sewn through it before the blocks are put together.  I posted the easy directions for this rag quilt a few weeks ago.


My favorite part of rag quilts is the back, they are so smooth to cuddle up in.  The back of this quilt does have a pattern, but I kept it very easy.  

Check out other Friday finishing with CrazyMomQuilting!  And Needle and Thread Thursday

I just wanted to show you all this beautiful quilt made by Cynthia, it has beautiful colors to match the beautiful pattern. 


Thursday, September 12, 2013

Crayon: Part 1

My dear daughter #2 decided that since I am making a Belle dress for her older sister, I needed to make her a costume also.  Thankfully her and her bestie decided that thy wanted to be crayons this year.  
After searching the computer, we decided on a duck tape costume.

We decided that because you tightly wrap the duck tape around your body to make the dress, we would wrap the older sister.  This way it wouldn't be so tight of a costume.  


First you wrap your body in a prewrap, we purchased this at Claire's boutique.

After the pre wrap, I wrapped one strip of duck tape around the top, one strip around the bottom and four strips vertically connecting the horizontal strips.


All that's left is spinning the duck tape around and around until their body is fully wrapped.

I then, carefully, cut the dress off of my daughter.  After doing this I reinforced all 4 sides with duck tape folded over them.


As you can see it doesn't lay flat with the normal curves of a body.  

Next I will:
1. Put Velcro all along the back, closing the back of the dress
2. Create the shoulders
3. Decorate the crayon with black duck tape


Wednesday, September 11, 2013

WIP Wednesday

I'm continuing to work on the quilts I am making for my niece and nephew.  They should have been finished two weeks ago but they are not quite there yet. 

 My nephews quilt:

As you can see it almost finished just a few more cuts.

My nieces quilt still needs three borders added around the main quilt as well as all the quilting/binding:
Hopefully this Friday his quilt will be finished and next Friday I can complete hers!

I linked it up with WIP wednesday

Monday, September 9, 2013

Belle

Hailey wants to be Belle this year for Halloween.  While at Swiss days craft fair, we saw some beautiful Belle dresses but they were each around $150.  We're not going there for an 11 year olds dress.  Yet, she can't wear a kids dress, they're all to small. Even the Disney stores are to small.  So,.....mom to the rescue, I guess I'll be making the dress this year.

I started the process by looking at dresses and patterns.  I really didn't like the patterns at Joann's, just not Hailey enough.  We did purchase all the fabric, I think we'll be able to make it for about $55.  I did opt out of the cheaper costume satin, it's just to thin.  It was only a 1/3 of the price, but not worth the cheapness.

So this is the dress we are using as a guide


And here is another idea


I'll make sure to post what's happening with this dress soon!

Tuesday, August 27, 2013

Rag quilts tutorial Tuesday

Have you ever seen those adorable rag quilts that are just so soft and look so easy, and then you try to make them and it takes forever?  I have, but that was years ago and now I think I have method down.

For this method, the quilt as you go method, you will need to cut all the squares you want for the front and then cut the same amount for the back of this quilt. 
This particular quilt I wanted to be bigger, something that could cover my nephew while he is at college, but not quite bed size.  I wanted 4 1/2" blocks when finished so I cut 6" blocks.  This lets 3/4" seam form your ragged edges.  Then you will need to cut your batting into squares, but the batting you don't want poking out on the ragged edges so ONLY cut the batting the size you want the finished blocks to be.  I cut 208 front/back/batting blocks each making this a 13 x 16 block quilt.


When all the blocks are ready, we can start putting the quilt together.  
Layer the two fabrics, right sides out with the batting in the middle.  The batting needs to be centered.

With machine quilting thread and a 90/14 needle, stitch an x across each set (top, batting & back)


When all blocks are sewn with the X across them, we can start sewing rows together.  When you see the blocks together, make sure you put the back sides together and have the fronts away from each other.  This will put the rag edge on the front of the quilt.


After the rows are all sewn, we will sew them all together.  Make sure that again while sewing these together the front is facing out and the back of the quilt is what is facing in.  Sew all rows together.  


Last (for sewing) you will sew a seam all the way around the outer edge of the quilt.  Sew this 3/4" from the edge.  I actually sewed a double seam, making it stronger.

After all the sewing go around and cut all the edges poking out on the top.  You will need strong scissors.  I recommend.  Make sure that you do not cut the seam, if you do you will have to resew it and give it really good reinforcements.  

This is what the edges look like after it's knipped and washed:

And here is my finished quilt!  

Tuesday, August 6, 2013

Tuesday Tutorials: Dresden plate

If any of you know me, you know that yellow and grey are just not my colors.  Yet, when I was walking through my fabric store, The Cotton Shop, the other day I fell is love with this fabric lines by Jackie Studios (there is also 1-2 fabrics by Camelot Fabrics).  I really was drawn to these fabrics and just had to get them.  BUT FOR WHAT?  Do quilters really need to ask that question when purchasing fabric?  No! Yet my husband continues to think there must be a purpose for my fabric purchases.

It just so happened that this store was having a fun class on using the dresden plate.  This is just what I have been wanting to do and just what use lots of prints of this fun fabric!  

It turned out that the dresden plate was so much easier than it looked.  
You will need:
a template, I have the EZ Quilting My an Easy Dresden Quilt template
rotary cutter & mat
at least 5 different colors of fabric
white (or any solid) fabric for the background)
sewing machine & accessories

Tip #1 the Block will turn out much larger than you think it will.  I cut some of my wedges with 6" strips of fabric and they create a 14 1/2" circular block.  Other wedges were cut with 5" strips of fabric and they created a 12" circular block.  

Start out by cutting your fabric into strips the width that you want your wedge length to be.  With these strips and your rotary cutter cut your wedges rotating back n forth as shown above.  You will need 20 wedges per circular block, so I made 4 of each color per block.  

  
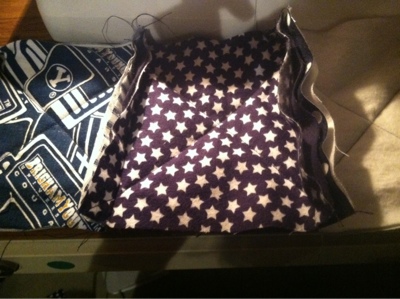
After all the wedges are cut, fold the wide end of the wedge in half (right sides together) and stitch them.  You can see I like to chain stich making these steps go so much faster


Next we turn the seam right side out and finger press open.  Iron this now so that it will lay straight.


Now you can start sewing the wedges together, make sure you backstitch the top of the wedges so that they will not come undone.

After each addition you will need to iron the pieces to keep them straight.  Ironing is VERY important to get your dresden block to lay straight.


Keep all the seams going the same directions while ironing so that it will lay much better.

I stiched 4 groups of 5 together and then stitched those four quarters together

Next the dresden circles all need appliqued onto their background.  You can decide which way you would like to applique these on, I am doing the applique by had.


Next circles will need to be appliqued to the center of the dresden 'flowers'.  Mine have yet to be finished but I will be using 5" circles for the 6" dresden wedge flowers and 3 1/2" circles for the 5" dresden wedge flowers.

Last of all you finish this like you would any quilt  with your backing, batting, quilting and binding.  Then I will have a beautiful table runner for my dining room table.