Showing posts with label alyssa. Show all posts

Wednesday, January 27, 2016

Quilts!

A year ago I made 3 quilts in December, two were for my daughters Christmas gifts and one was for the BOM at the local Cotton Shop.  I regret to say that the BOM quilt is still not quilted, it hang on the wall in their shop for 12 months and the last few weeks I just haven't had the desire to finish an 'old forgotten' quilt.  Until then it may just have a spot on my shelf.

The other two quilts I blogged about a little but I never did show the finished products. DD1 (darling daughter #1) received a hopscotch quilt, it's prior post goes into the fabric and pattern choices.  She's also the daughter I did the geometric patterns painted on her wall.

Here is her finished wall:


And quilt:


Starting out with all the triangle was difficult, but the quilt came together quickly and in the end I really love the finished quilt.  It is definitely my favorite quilt that I have made.

You can see its back goes well with the pattern painted on the wall.  It's not often you get to choose the paint color, pattern, head board, and decorations in a bedroom, all around the quilt.  But the quilt pattern and fabric was my basis for her bedroom.  


DD2's quilt was a pattern that she chose and she also chose the fabric at the Missouri Quilt shop.  We were just driving through a small town while on vacation, and I could not pass up the opportunity to stop there.  Here is the ink  to the making her her quilt and the final product.  It fits her personality perfectly.


This is my nephew Brets quilt I made for his graduation last summer.  He's on a service mission for the next 16 months so I am holding it for him.  It is made with Modas Reel Time fabric.


I had a hard time choosing the quilting thead color.  I went with orange even though the back of the quilt is green.  I really like the visibility of the pattern, it stands out nicely but isn't to bold.


Tuesday, November 18, 2014

Piecing


As the weather gets cooler colder and colder outside, and with Thanksgiving Holiday just a few days away, I seem to be turned to my kitchen.  I really love cooking, it ranks up there with laying on the beaches of Kauai in the warm sunshine, and sewing my heart away on a new quilt.

Sunday I had a wonderful time fixing a small version of Thanksgiving, all it was missing was the jello salads, turkey and stuffing. (Plus the 50 appetizers my family thinks is necessary).


I even had my 10 year old daughter make this delicious Apple Pie, my older daughter made German Chocolate Brownies and both were so YUMMY!

I had the middle daughter make the pie, to try out this pie crust recipe.  It was her first ever trial and well its a keeper and I will use it for the 5 pies I get to make next Wednesday for Thanksgiving dinner.


 Today while daughter #4 was at preschool, I could actually work on the Christmas Quilt I am making for that 10 year old daughter.  I had most of the blocks made, just needed to finish squaring up a few of them (well about 30). 


This quilt will be 8 blocks wide by 10 blocks long 


I actually got all the rows pieced together and now just need to sew them together during preschool tomorrow!

Tuesday, October 21, 2014

Alyssa Quilt: part 3 (finishing it up)


Today it's time to finish up this quilt!
You can check out Step 1 and Step 2 in prior blog posts

Step 1:
 Last time we pieced the blocks together so the first step today is add your border.  On this quilt I added a 3 1/2" border of a coordinating Miss Kate fabric.  On the twin Alyssa quilt I will be adding two borders, the inner border will be a 2 1/2" white border (my light color will be white on that quilt) and the outer will be a 4" colorful border.

Step 2:

Baste your quilt.  (I duck tape my individual pieces to the concrete floor in my basement and then pin them together.)

Step 3: 

Quilt your quilt.  


Step 4:

Bind your quilt (sorry on this post I'm not going into much detail on this)


Most quilts I stitch the binding to the front and then hand stitch the binding to the back, but baby quilts get washed more and need more strength so I stitch the binding to the back first and the stitch it to the front like this:


There you have it, these quilts are so easy to make!  

I made two of these Alyssa style baby quilts (and I still have fabric to make another quilt for a cousin having their first baby):

One had one floralish back and one has a polka dot back so they can be used for twins. They are both available in shop oetsy


I have linked up to:  Freshly Pieced // MyQuiltInfatuation  // Quilt Story // Free Motion By The River // Blossom Heart Quilts // Sew Fresh Quilts

Wednesday, October 8, 2014

WIP Wednesday

Freezer Meals are some of my favorite things.  But, those of you that know me know that sometimes when i do projects, I go a little overboard.  Last week, I decided to make freezer meals on Tuesday.  I found the recipes, best sales, did my shopping and planned to make 27 meals.  One thing I forgot was that I can't stack things in my freezer until they're frozen!


I did make 25 meals yesterday and still have two more to make today.

After making all of these, I needed to sit down and what better place to set down to than the sewing machine!


I did finish this baby boy quilt and it binding.  This is the first quilt that I have ever machine bound and it turned out really good.  Thanks quilters for sharing with me how to do this.

It is made with almost all Riley Blake Fabrics and is available on etsy


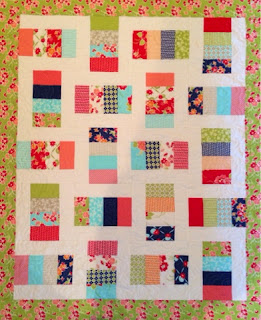
And here is my Alyssa quilt which I also listed on etsy

It's made with Moda's Miss Kate line and has a aqua flannel back 


I will make a post on this later!

Wednesday, October 1, 2014

Alyssa: part 2

Click here to get to Alyssa: Part 1
Click here to get to Alyssa: finishing it up

With the Miss Kate line, setting aside 8 strips of light fabric (I'm only using the brighter fabrics for this quilt) I created 72 strip blocks 4 1/2" x 8 1/2".  The current quilt I am making only needs 20 blocks, leaving me plenty for future projects.

Now on to our next steps

Step 6:

Our blocks are going to go together like this, one neutral strip sewn to each side of a strip block, making it a 8 1/2" square block.


 It will work much faster if you will chain piece them together.
 We create this by first sewing a neutral strips onto the edge of a  strip block.

After sewing one neutral piece onto each block, iron that side with the seam towards to neutral strip.  I left my blocks linked together until after I had ironed the.  It makes the process much faster and more organized.

Next, stitch in the other side and iron it just as you did the first side.

Step 7:

Square up your blocks to all be 8 1/2" square

Step 8: 

Lay your blocks out into the desired pattern

Step 9:

As you complete this step, you will have to iron as you go.  This will keep your seems laying flat and not making bulk behind your quilt.

Sew your quilt together in rows, 1 at a time.  Iron towards the neutral strip.  
Now you get to do the fun part :). 
Sew two rows together!

Here is my tips:  1: make sure the seams kiss when they meet 2.  When ironing I used the Eleanor Burns method, for the seam shown see how they are going counter clockwise, iron your row joining seam that way. Then 3: pop the seam and flatten it so that it will lay completely flat leaving no bulk and allowing you front to lay perfectly.

This is what the quilt looks like until Part 3, which is to come soon!